How to Replace a Toilet Fill Valve? – Step-By-Step DIY Guide
By having a toilet fill valve in place, you can be sure that your toilet is using the minimum amount of water necessary to function properly. This can save you money on your water bill, and it can help to reduce the amount of water wasted each day.
Follow these steps for a DIY toilet fill valve change:
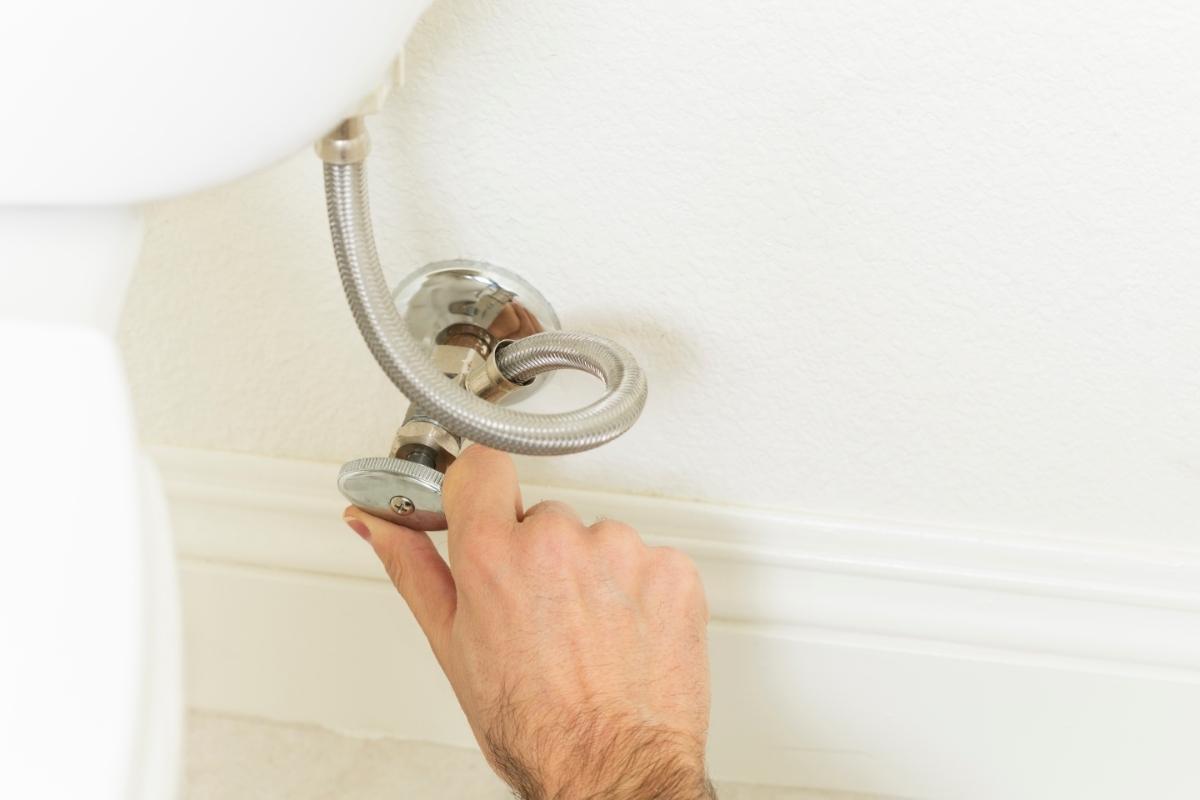
- Turn off the water to the toilet by shutting off the valve behind the toilet or by shutting off the main water supply to the house.
- Flush the toilet. The tank and bowl must be emptied.
- Remove the cap from the valve and use pliers to remove the nut holding the valve in place.
- Pull the old valve out and away from the tank.
- Insert the new valve into the tank and hand-tighten the nut to hold it in place.
- Turn on the water and check for leaks. Flush the toilet to fill the tank and bowl.
Toilet water valve can break down over time. If your Toilet fill valve breaks down, it is important to replace it as soon as possible.
In this article, we’ll talk about how to replace a toilet fill valve.
What is a Toilet Fill Valve?
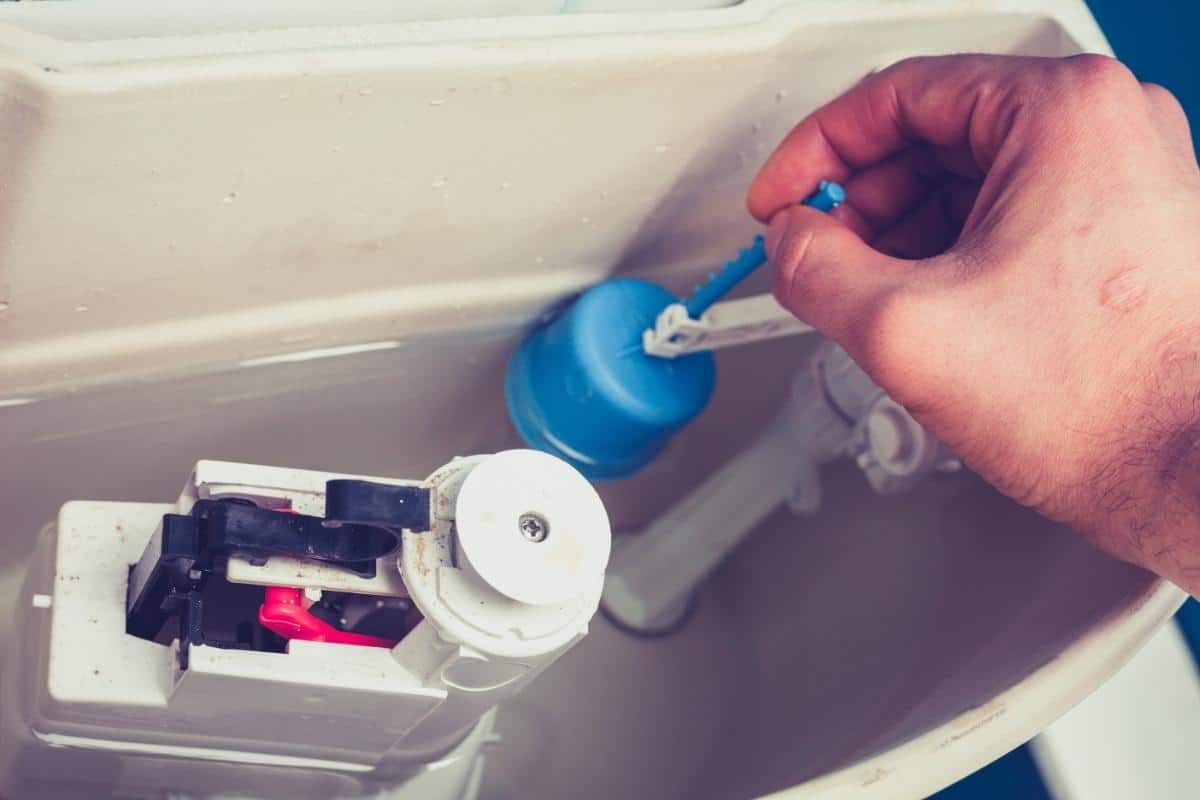
A toilet fill valve is a valve that controls the flow of water into the toilet tank. It is typically located on the back of the toilet near the water supply line. The fill valve has a float attached to it that rises and falls with the water level in the tank.
As the water level in the tank drops, the float drops as well, which opens the fill valve and allows water to flow into the tank. Once the water level in the tank reaches the float, the float rises, which closes the fill valve and stops the flow of water.
How to Choose the Right Toilet Fill Valve?
There are many types of fill valves on the market, and it can be confusing trying to figure out which one is the best for your toilet. Here are a few things to keep in mind when choosing a fill valve:
- The right size. Fill valves come in different sizes, and using the wrong size valve can cause problems.
- The type of toilet water valve. There are three main types of toilet fill valves: ball cock, piston, and float cup. Each type has its own advantages and disadvantages, so it is important to know which one you have in order to make the most appropriate repairs.
- Material of toilet fill valve. Toilet fill valves are typically made from brass or plastic. Brass valves are more durable and less likely to leak, but they are also more expensive. Plastic valves are less expensive, but they may not be as durable and may be more likely to leak.
- The warranty. Some fill valves come with a warranty, so if you have any problems, you’ll be covered.
- The price. Toilet fill valves range in price, so find one that fits your budget.
The right size
Toilet fill valves come in a variety of sizes, so it’s important to choose the right size for your toilet. The size is determined by the diameter of the inlet opening on the bottom of the tank.
If the inlet opening is about the size of an orange, you need a 2-inch fill valve.
If the inlet opening looks more like the size of a softball, you need a jumbo 3-inch fill valve.
Types of toilet water valve
Ball cock valves are the most common type of fill valve used in toilets. This type of valve uses a float ball that sits on top of the water in the toilet tank. The float ball is connected to a lever that is attached to the fill valve. As the water in the tank rises, the float ball rises with it.
When the water reaches a certain level, the float ball triggers the lever to open the valve, allowing water to flow into the toilet bowl. Once the water in the toilet bowl reaches the desired level, the float ball shuts off the valve, stopping the flow of water.
Piston valves are similar to ball cock valves, but instead of using a float ball, they use a piston. The piston is connected to a lever that is attached to the fill valve. As the water in the tank rises, the piston rises with it.
When the water reaches a certain level, the piston triggers the lever to open the valve, allowing water to flow into the toilet bowl. Once the water in the toilet bowl reaches the desired level, the piston shuts off the valve, stopping the flow of water.
Float cup valves are the least common type of fill valve used in toilets. This type of valve uses a float cup that sits on top of the water in the toilet tank. The float cup is connected to a lever that is attached to the fill valve. As the water in the tank rises, the float cup rises with it.
When the water reaches a certain level, the float cup triggers the lever to open the valve, allowing water to flow into the toilet bowl. Once the water in the toilet bowl reaches the desired level, the float cup shuts off the valve, stopping the flow of water.
Precautions for Replacing a Toilet Fill Valve
When replacing a toilet fill valve, it is important to take some precautions to avoid damaging the toilet or causing injury.
First, turn off the water supply to the toilet before starting any work.
Next, use a wrench to remove the old fill valve from the tank. Be careful not to damage the tank or bowl while removing the old valve.
After the old valve is removed, clean the area where the new valve will be installed.
Then, carefully install the new valve, making sure it is tight and will not leak.
Finally, turn the water supply back on and check for leaks. If there are any leaks, turn off the water and tighten the valve until the leak stops.
The Tools and Materials You Need to Replace a Toilet Fill Valve
You will need a sponge and bucket to clean the area around the old fill valve. You will also need two channel-type pliers to loosen and remove the old valve. The materials you will need to install the new fill valve include a new fill valve and a nut.
Instructions for Replacing a Toilet Fill Valve
The toilet fill valve controls the amount of water that flows into the toilet bowl. If the fill valve is not working properly, the toilet will not flush correctly and may overflow. Replacing the toilet fill valve is important in order to maintain a functioning toilet.
Follow these steps to install a toilet valve.
Remove the old toilet fill valve
Shut off the water to the toilet at the shutoff valve, which is usually located behind the toilet. Flush the toilet to empty the tank and then disconnect the water supply line from the fill valve. Use channel-type pliers or an adjustable wrench to loosen the nut that secures the fill valve to the tank and then remove the fill valve.
You may have to go down into the tank from above and grasp the bottom of the fill valve with another set of pliers to keep it from turning as you loosen the fastening nut.
Prepare the new fill valve
Before you install your new fill valve, it’s important to take a few minutes to prepare the valve and the area around it. This will help to ensure a proper seal and a trouble-free installation.
Using a putty knife, scrape away any old putty or debris from the bottom of the tank where the fill valve will be installed. Clean this area with a damp cloth.
Now, take a look at the new fill valve. It’s likely that the valve has a rubber nut attached to the bottom flange. If so, slide the nut onto the tailpiece of the fill valve. This nut will provide an internal seal that will prevent leakage around the base of the filler valve.
Next, adjust the height of the fill valve, if necessary. Different valves have different methods for doing this, but in most cases, it is a simple matter of screwing part of the stem shorter or longer so that the total length of the fill valve will fit inside your toilet tank.
Ideally, the top of the filler valve should be slightly higher than the top of the overflow pipe, but not so much as to prevent the tank lid from closing.
Install the new toilet valve
Insert the new toilet valve into the tank, making sure that the outlet nipple is facing the overflow tube. Use one hand to hold the valve in place, and use the other hand to thread the mounting nut onto the tailpiece from below the toilet.
Tighten the mounting nut so it is hand-tight, and then use channel-type pliers to tighten it slightly further. Make sure not to twist the body of the valve inside the tank.
Finally, reconnect the water supply tube to the valve. First, tighten by hand, and then use pliers to tighten some more.
Connecting and adjusting the toilet valve
To connect the toilet valve, first, attach one end of the rubber fill tubing to the nipple on the top of the fill valve.
Then, attach the plastic or metal adapter to the other end of the tubing and clip it to the top of the overflow tube.
Finally, turn on the water supply valve all the way.
To adjust the water level, simply watch as the toilet tank refills with water. Once the desired water level is reached, turn off the water supply valve.
The tank should be filled to the marked water line on the inside walls of the tank; the water level should be about one inch below the top of the overflow tube.
Tips
If you are replacing a toilet fill valve, there are a few things to keep in mind:
- Have scissors ready in case the rubber tube is too long and has to be cut. The tube should bend smoothly without kinks when connected to the overflow tube.
- Be very careful when turning on the whole house water supply if the valve is not near the toilet. Ask a second person to go into the bathroom and make sure there are no leaks while you restore the water supply.
FAQ
Is replacing a toilet fill valve easy?
Yes, replacing a toilet fill valve is easy, especially if you have a wrench. The most difficult part is probably removing the old fill valve. Once the old fill valve is removed, simply screw in the new one and reconnect the water supply.
Are all toilet fill valves universal?
Most toilet flush valves are designed to be compatible with other valves of the same type. For example, a universal float cup valve will fit most brands of toilet cisterns that contain a similar valve.
However, it is always best to check with the manufacturer to be sure that a particular valve will fit your toilet model.
What happens when a toilet fill valve is broken?
If a toilet fill valve is broken, it will not be able to properly fill the tank with water. This can lead to a number of problems, including a constantly running toilet and a toilet that does not flush properly. In some cases, a broken fill valve can also cause the toilet to overflow.
What size fill valve do I need?
To determine what size fill valve you need, simply measure the diameter of the overflow pipe attached to the inside of your toilet tank. If the diameter of the overflow pipe is 1/2 inch, then you will need a 1/2 inch fill valve.
If the diameter of the overflow pipe is 3/4 inch, then you will need a 3/4 inch fill valve.
How do you fix a toilet fill valve?
If your toilet fill valve is constantly running, or if it isn’t shutting off properly, there are a few things you can do to fix it. First, make sure the water supply to the toilet is turned off. Then flush the toilet to empty the tank. Then, remove the lid of the tank and flush the valve by holding down the plunger.
If the valve is still not working properly, you may need to replace it.
Bottom Line
When a toilet fill valve becomes damaged, it can cause a number of problems. First, it may cause the toilet to flush less effectively, leading to clogs. Second, it may cause water to leak from the tank, wasting water and increasing your water bill. Third, it may simply stop working, leaving you without a working toilet.
It is important to replace a toilet fill valve as soon as possible to avoid these problems.
Do you have any experience with replacing a toilet fill valve? Share it in the comments.


